

If you’ve been dreaming about creating your own vibrant, textured, and cozy rug, you’re in the right place.
This rug tufting tutorial is your co
mplete guide to how to make a rug — even if you’re a total beginner.
Rug tufting is a creative, fun, and highly rewarding hobby that’s booming in popularity. With the right tools and guidance, you can craft beautiful custom rugs for your home, gifts, or even start your own small business!
In this guide, you’ll learn:
-
What rug tufting is
-
Why rug tufting is the best DIY craft to learn right now
-
Step-by-step instructions to start making your first tufted rug
-
Must-have tools and materials for tufting
-
Tips for perfect results every time
-
Where to find the best online rug tufting tutorial to fast-track your success
Let’s dive in and start tufting!
What is Rug Tufting?
Rug Making
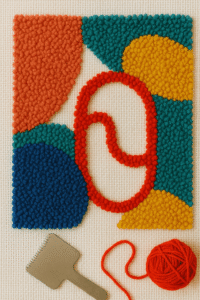
Rug tufting is a method of creating rugs by pushing yarn through a backing fabric using a special tool — either by hand or using a tufting gun.
In tufting, loops of yarn are inserted into a fabric base (often monk’s cloth or primary tufting fabric). These loops form the surface of the rug, which can later be trimmed and shaped into stunning designs.
The magic of tufting lies in how fast and customizable it is — you can create bold shapes, intricate patterns, and any color combination you can imagine.
Why You Should Learn Rug Tufting
There are dozens of creative crafts out there, but rug tufting stands out. Here’s why:
1. Easy to Start (Even for Complete Beginners)
You don’t need to be an artist, a professional crafter, or have any special training. With the right tutorial, you can learn how to tuft a rug quickly and confidently.
2. Express Your Creativity
Your rug can be any shape, color, or design you want. Abstract art, cute cartoons, bold typography — anything is possible with tufting.
3. Relaxing and Therapeutic
Many people find tufting incredibly satisfying. The rhythmic motion of the tufting gun is calming and stress-relieving — a perfect weekend hobby.
4. Opportunity to Sell Handmade Rugs
Custom handmade rugs are highly sought-after. Once you master the basics, you can turn your skill into a thriving Etsy shop, Instagram store, or side hustle.
What You’ll Learn in Our Complete Rug Tufting Tutorial
Our online Rug Tufting Tutorial covers everything you need to know:
-
Setting up your tufting frame and workspace
-
Choosing the right tufting gun (cut pile vs loop pile)
-
Picking the best yarn for tufting
-
Stretching and securing your backing fabric
-
Sketching your rug design on fabric
-
Tufting techniques for beginners
-
Trimming, carving, and finishing your rug professionally
-
Adding glue and applying backing fabric
-
Troubleshooting common tufting problems
Essential Tools and Materials for Rug Tufting
Before you start tufting, you’ll need a few basic tools. Here’s your must-have rug tufting supply list:
| Item | Purpose |
|---|---|
| Tufting Gun | The main tool used to insert yarn into the fabric |
| Monk’s Cloth or Primary Tufting Cloth | The backing fabric that holds your rug together |
| Yarn (Acrylic, Wool, or Cotton) | The colorful material that makes up your rug |
| Tufting Frame | A sturdy frame to hold your fabric tightly |
| Carpet Adhesive | To lock your yarn loops into place |
| Backing Fabric (Felt or Canvas) | To finish the back of your rug |
| Shears or Trimmer | For cutting and shaping the rug pile |
| Projector (optional) | For tracing complex designs onto your fabric |
How to Make a Rug: Step-by-Step Rug Tufting Tutorial
Now, let’s go through the basic process of tufting your first rug.
Step 1: Build or Buy a Tufting Frame
You’ll need a wooden frame slightly larger than the size of the rug you want to make. Add carpet grippers around the edges to hold the backing fabric tightly.
Step 2: Stretch and Secure the Fabric
Use strong clamps or staple guns to stretch monk’s cloth tightly across your tufting frame. The fabric should be taut like a drum.
Step 3: Sketch Your Rug Design
Using a projector or freehand, sketch your design directly onto the fabric with a marker. Keep it simple for your first rug!
Step 4: Load Your Tufting Gun
Thread your yarn into your tufting gun following the manufacturer’s instructions. Make sure the yarn flows smoothly without tension.
Step 5: Start Tufting
Hold the tufting gun at a slight angle against the fabric. Gently squeeze the trigger and move steadily along your drawn lines. Fill in color areas as you go.
Remember: Let the tufting gun do the work — don’t force it.
Step 6: Glue the Back
Once your design is finished, apply a generous layer of carpet adhesive to the back of your rug. Let it cure completely (this may take 24–48 hours).
Step 7: Trim and Shape
Use shears or a rug carving trimmer to neaten your design, sharpen lines, and sculpt your rug’s surface.
Step 8: Attach the Backing
Glue or sew a piece of felt or canvas onto the back of your rug to finish it neatly.
And just like that — you have your very first handmade tufted rug!
Common Rug Tufting Mistakes (And How to Avoid Them)
Mistake 1: Fabric Too Loose
👉 Solution: Always stretch your monk’s cloth as tight as possible.
Mistake 2: Uneven Yarn Tension
👉 Solution: Use yarn feeders or baskets to maintain smooth yarn flow.
Mistake 3: Inconsistent Pile Height
👉 Solution: Maintain consistent hand pressure and tufting speed.
Mistake 4: Glue Not Drying Properly
👉 Solution: Use the correct type of adhesive and allow sufficient drying time before trimming.
Where to Find the Best Rug Tufting Tutorial Online
If you’re serious about learning how to make a rug and want detailed, beginner-friendly instruction, our online Rug Tufting Tutorial is the perfect solution.
✅ Lifetime access to step-by-step video lessons
✅ Learn at your own pace, from anywhere
✅ Instant supply list with links to trusted stores
✅ Live support for troubleshooting
✅ Bonus tips on selling your rugs online
Rug tufting is one of the most exciting, creative, and accessible crafts you can learn today. Whether you want to make rugs for yourself, for gifts, or for sale, mastering how to make a rug opens up endless possibilities.
With our complete online Rug Tufting Tutorial, you’ll go from beginner to skilled creator in no time — and have a lot of fun along the way.
Let’s bring your creativity to life — one tuft at a time.